How to use ISaGRAF PAC plus i-87089 – the VW sensor master card to measure the Vibration Wire frequency to calculate the stress of constructions ?
ICP DAS phát hành giải pháp cảm biến VW hiệu quả (đo cảm biến dây rung). Giải pháp này đã được áp dụng thành công trong một số hệ thống giám sát đập nước gần thành phố Wuhang của Trung Quốc. Nó rất hữu ích để đo ứng suất của các công trình xây dựng như xây dựng, cầu, đập, v.v.
Các ISaGRAF PAC sau có thể hỗ trợ i-87089 (VW master card) cùng với DN-1618UB (daughter board). Hãy chắc chắn rằng nếu ISaGRAF PAC của bạn có đúng driver ISaGRAF.
(Mỗi i-87089 có thể kết nối tối đa 4 bảng mạch con DN-1618UB. Mỗi DN-1618UB có thể kết nối tối đa 8 kênh cảm biến VW. Vì vậy, mỗi i-87089 có thể đo tối đa 8 x 4 = 32 kênh VW .) Trình điều khiển ISaGRAF mới được phát hành: https://icpdas.com.vn/pac/
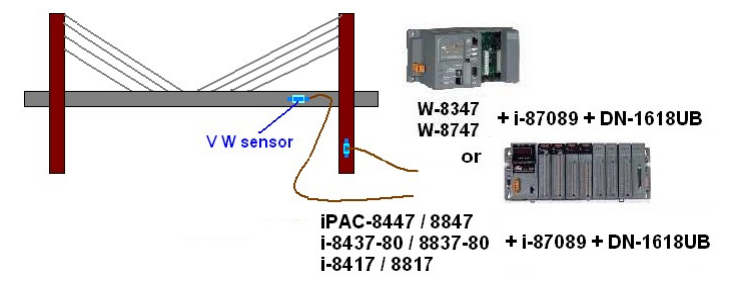 (Hình này chỉ để giới thiệu. Kích thước và cấu hình phải tùy thuộc vào ứng dụng thực) Mỗi DN-1618UB đều có một bộ chuyển mạch nhúng 8 bit để đặt NET-ID của nó. Nếu chỉ có một DN-1618UB được kết nối bởi i87089, vui lòng đặt NET-ID của nó thành 1 (chuyển Dip 1 sang vị trí “ON”). Nếu hai kết nối được kết nối, vui lòng đặt DN-1618UB đầu tiên là 1, DN-1618UB còn lại nên đặt là 2. (chuyển Dip 2 thành “ON”). Nếu ba kết nối được kết nối, vui lòng đặt cái đầu tiên là 1, cái thứ hai là 2, DN-1618UB cuối cùng là 3 (chuyển Dip 1 và 2 thành “ON”). Nếu có bốn DN-1618UB được kết nối, vui lòng đặt đầu tiên là 1, thứ hai là 2, thứ ba là 3 và DN-1618UB cuối cùng là 4 (chuyển Dip 3 sang vị trí “ON”)
- Viết chương trình sử dụng i-87089
Lưu ý: Thông thường, i-87089 dùng để đo tần số của Cảm biến VW. Nếu cảm biến VW hỗ trợ đo nhiệt độ, vui lòng nhập trước tệp bảng nhiệt độ thích hợp vào i-87089. Vui lòng tham khảo các bước được liệt kê trong phần 2 của tài liệu này
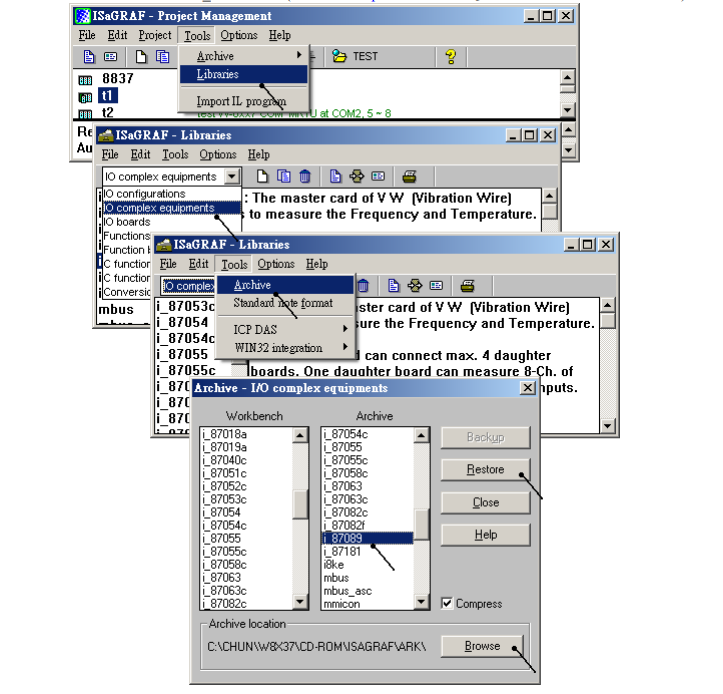
Hãy đảm bảo rằng thiết bị “i_87089” – I/ O đã được kết nối thành công với ISaGRAF. Tên tệp là “i_87089.xia” (truy cập www.icpdas.com> FAQ> Software> ISaGRAF> 091)
* All frequency and temperature values of the i-87089 are stored as long interger format. If user want to define the modbus network address to these IsaGRAF variables, please define them to occupy 2 modbusư number. Please refer to section 4.2 of the “User’s manual of the ISaGRAF PAC” )
Để lập trình i-87089, vui lòng kết nối “i_87089” trong số vị trí được liên kết, sau đó đặt các thông số thích hợp của nó cho tất cả các kênh được kết nối.
Sample_rate : Đơn vị là ms (0,001 giây). Giá trị có thể là 2000 ~ 600000. Nó có nghĩa là khoảng thời gian quét của kênh này sang kênh khác.
daughter_num: Có bao nhiêu DN1618UB được kết nối. Giá trị có thể là 1 ~ 4.
ScanSeting_xx_xx: tần suất sử dụng. Scan setting
0 : 0.4K ~ 3KHz 1 : 0.45K ~ 1.2KHz
2 : 0.8K ~ 2KHz 3 : 1.4K ~ 3.5KHz
4 : 2.4K ~ 6KHz
Ví dụ
setting as 34111111 means setting Ch.1 as 3 (1.4 ~ 3.5KHz), Ch.2 as as 4 (2.4 ~ 6KHz), Ch.3 to 8 are as 1 (0.45 ~ 1.2KHz)
TemperFile_xx_xx: the temperature table file No. for each channel. Each digit value can be 1 ~ 8. For example, setting as 12333333 means setting Ch.1 to use temperature table File 1, Ch.2 to use file 2, Ch.3 to 8 to use File 3. Max. 32-Ch frequency inputs. Variable type should be Integer / Input. Unit is 0.01 Hz.For ex., if value is 235058 , it means 2350.58 Hz
Type : can be 1: degree Celsius or 2: degree Fahrenheit. However if the temperature table file in the i-87089 is using Degree Fahrenheit, then setting as 1 will use “Degree Fahrenheit” . (Please refer to the description of “step 3” in section 1.2). Max. 32-ch temperature inputs. Variable type should be Integer / Input. Unit is 0.01 degree. For ex., if value is 2655 , it means the temperature is 26.55 degree. Value of 999900 means sensor-broken-line. Value of 888800 means no temperature table file found.
Rest_tim : 1-Ch. Integer output to dynamically change the “rest_time”. Unit is second. Can be 0 ~ 36000. It means the time to rest after one scan cycle (one cycle will scan all channels in i-87089).
2 : Use the VW Utility to import temperature table files into the i-87089
The i-87089 normally is for measuring the frequency of VW Sensors. There are two frequency signals in each VW senosr. Please connect them to the correct terminal pin ( VW+ , VW- ) of the associated channel in the DN-1618UB . If the user’s VW sensor also support temperature measuring, user have to import the temperature table file into the i-87089 in advance to get the correct temperature value. The associated pin for temperature is ( TH+ , TH- ) in each channel. The steps to import listed as below.
Step 1:
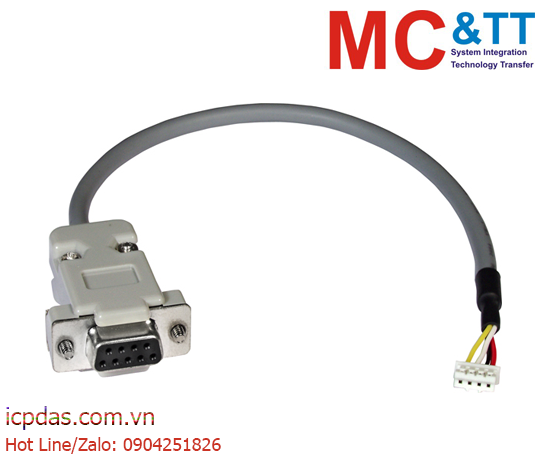
Please switch off the power of the ISaGRAF PAC. Then please connect one “CA-0904” cable in the JP2 postion (white terminal, 4-pin) of the i-87089.
Then please plug this i-87089 (with CA-0904 connected) into Wincon-8xx7’s slot 2 or 3 (or slot 2 or 3 of the other PAC ). Please note the leftmost slot No. of the Wincon-8xx7 is slot 1, while the i-8437-80 / i-8837-80 , i-8417 / 8817 , iPAC-8447 / 8847 and WinPAC-8447 / 8847 ‘s leftmost slot No. is slot 0. (The CA-0904 will not work if plugging the i-87089 into slot 4 thru. 7 of the iPAC-8447 / 8847 and WinPAC) . Then please connect this CA-0904 to one RS-232 port of your PC. Then switch on the controller’s power.
Step 2:
Please visit www.icpdas.com.vn> FAQ > Software > ISaGRAF > 091 to download the document and files for the i-87089. These files includ the VW utility will be burned into the following CD-ROM since Aug.2008 8000 CD-ROM: \napdos\ISaGRAF\some_utility\i87089\ or Wincon-8xx7 CD-ROM: \napdos\ISaGRAF\some_utility\i87089\ Then please install the VW Utility to your PC by running the “VW_Utility_V2003.exe” (PC should be Windows 2000, XP or compatible Operating System). Then please run VW Utility as below.
Note: The VW Utility will not run if no “MicroSoft .NET frame work 2.0” found in the PC. User may visit the below web site to get it .
Step 3:
The files download at www.icpdas.com > FAQ > Software > ISaGRAF > 091 includes two temperature table files. One is named as “GeoKon_kv4100_4150.csv”, it is for some VW sensors from the “GeoKon” . The other one is named as “ACE_RTD_2k_Ohm_20_degree.csv” . Please enter the correct RS-232 port No. in the VW Utility , then clik on “Open” to open this RS-232 port in
your PC.
Then please click on “Upload Temperature Table” , the below window will show up. Then click on “Browse” to open the temperature table file, below is using the “GeoKon_kv4100_4150.csv” .
By clicking on the “PreView” of the above figure, the temperature table will show as below
The left column is for entering the temperature value, while the right column is for entering the associated resistor value of the temperature sensor. All these values should be integer (no floating point value allowed). The top temperature value should be the lowest temperature value in this table. The temperature value should increase by going down position. It will generate wrong temperature value if the temperature value in the down position is smaller or equal to the value on the up position.
However the resistor value on the right column may increase by going up or going down. It depends on the temperature sensor.
If the temperature unit is using °C (Degree Celsius), then the“ISaGRAF I/O connection > i_87089 >Temper > Type” setting listed in section 1.1 will apply 1 as degree Celsius, apply 2 as degree Fahrenheit . However if the unit in left column is °F , then Type = 1 will apply as degree Fahrenheit (This case “2” is not allowed) .
To import this temperture table into the i-87089, please click on “Upload” . Then after a successful or failed message will show up in the bottom of the below windows.
To create a new temperature table file, user can copy this “GeoKon_kv4100_4150.csv” to one another file name. For example, to be “NewTable2.csv” , then edit it. Then importing it by the VW Utility into i-87089. Each i-87089 can be imported max. 8 temperature table files inside in advance. The file number will be 1 to 8 . This file No. is the number used in the “ISaGRAF I/O connection > i_87089 > Freq >TemperFile_01_08 ~ TemperFile_25_32” listed in section 1.1 .
Step 4:
When the import is done, please exit the VW Utility. Then switch off the power of the ISaGRAF PAC. Plug out the i-87089 and remove the connected CA-0904 cable. Then this i-87089 will work if it is plug into the ISaGRAF PAC with the program running as listed in the section 1.1.
Note:
1. The Wincon-8xx7 doesn’t have slot No. 0, Its leftmost slot No. is 1 .
2. The i-8437-80 / 8837-80 and i-8417 / 8817 controllers support only max. 4 pcs. of i-87089 in the slot No. of 0 ~ 3 .