Trạng thái của một đối tượng bị thay đổi được gọi là một sự kiện (event). Ví dụ, bấm vào nút, kéo chuột, vv Gói java.awt.event cung cấp nhiều lớp sự kiện và interface Listener để xử lý sự kiện Java AWT.
Nội dung
1. Các lớp Java Event và các interface Listener
| Các lớp Event | Các interface Listener |
|---|---|
| ActionEvent | ActionListener |
| MouseEvent | MouseListener and MouseMotionListener |
| MouseWheelEvent | MouseWheelListener |
| KeyEvent | KeyListener |
| ItemEvent | ItemListener |
| TextEvent | TextListener |
| AdjustmentEvent | AdjustmentListener |
| WindowEvent | WindowListener |
| ComponentEvent | ComponentListener |
| ContainerEvent | ContainerListener |
| FocusEvent | FocusListener |
Phương thức đăng ký
Để đăng ký thành phần với trình Listener, có nhiều lớp cung cấp các phương thức đăng ký. Ví dụ:
- Buttonpublic void addActionListener(ActionListener a){}
- MenuItempublic void addActionListener(ActionListener a){}
- TextFieldpublic void addActionListener(ActionListener a){}public void addTextListener(TextListener a){}
- TextAreapublic void addTextListener(TextListener a){}
- Checkboxpublic void addItemListener(ItemListener a){}
- Choicepublic void addItemListener(ItemListener a){}
- Listpublic void addActionListener(ActionListener a){}public void addItemListener(ItemListener a){}
2. Ví dụ xử lý sự kiện trong Java AWT
Chúng tôi có thể đặt mã xử lý sự kiện vào một trong các vị trí sau:
- Bên trong lớp hiện tại.
- Bên trong lớp khác.
- Bên trong lớp nặc danh.
Xử lý sự kiện Java AWT – bên trong lớp hiện tại
import java.awt.Button;
import java.awt.Frame;
import java.awt.TextField;
import java.awt.event.ActionEvent;
import java.awt.event.ActionListener;
public class AWTEventHandling1 extends Frame implements ActionListener {
private TextField textField;
public AWTEventHandling1() {
// tạo các thành phần
textField = new TextField();
textField.setBounds(60, 80, 170, 20);
Button button = new Button("click me");
button.setBounds(100, 120, 80, 30);
// đăng ký trình listener
button.addActionListener(this);
// thêm thành phần, kích thước, layout, khả năng hiển thị
setTitle("Vi du xu ly su kien Java AWT");
add(button);
add(textField);
setSize(400, 300);
setLayout(null);
setVisible(true);
}
@Override
public void actionPerformed(ActionEvent e) {
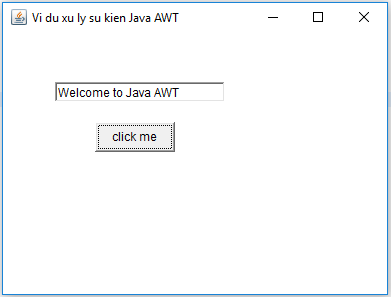
textField.setText("Welcome to Java AWT");
}
public static void main(String args[]) {
new AWTEventHandling1();
}
}
Xử lý sự kiện Java AWT – bên trong lớp hiện khác
Tạo lớp view: AWTView.java:
import java.awt.Button;
import java.awt.Frame;
import java.awt.TextField;

public class AWTView extends Frame {
    TextField textField;

    AWTView() {
        // tạo các thành phần
        textField = new TextField();
        textField.setBounds(60, 80, 170, 20);
        Button button = new Button("click me");
        button.setBounds(100, 120, 80, 30);
        // đăng ký listener
        Controller obj = new Controller(this);
        button.addActionListener(obj);
        // thêm thành phần, kích thước, layout, khả năng hiển thị
        setTitle("Vi du xu ly su kien Java AWT");
        add(button);
        add(textField);
        setSize(400, 300);
        setLayout(null);
        setVisible(true);
    }
}
Tạo lớp controller: Controller.java:
import java.awt.event.ActionEvent;
import java.awt.event.ActionListener;

public class Controller implements ActionListener {
    AWTView obj;

    Controller(AWTView obj) {
        this.obj = obj;
    }

    @Override
    public void actionPerformed(ActionEvent e) {
        obj.textField.setText("Welcome to Java AWT");
    }
}
Tạo lớp AWTEventHandling2.java:
public class AWTEventHandling2 {
    public static void main(String[] args) {
        AWTView view = new AWTView();
    }
}
Kết quả:

Xử lý sự kiện Java AWT – bên trong lớp nặc danh
import java.awt.Button;
import java.awt.Frame;
import java.awt.TextField;
import java.awt.event.ActionEvent;
import java.awt.event.ActionListener;
public class AWTEventHandling3 extends Frame {
TextField textField;
AWTEventHandling3() {
textField = new TextField();
textField.setBounds(60, 50, 170, 20);
Button button = new Button("click me");
button.setBounds(50, 120, 80, 30);
button.addActionListener(new ActionListener() {
@Override
public void actionPerformed(ActionEvent e) {
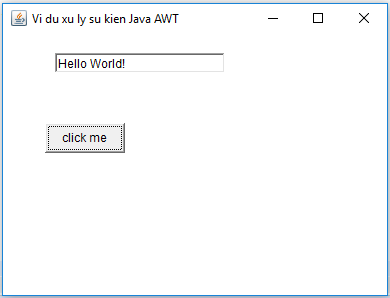
textField.setText("Hello World!");
}
});
setTitle("Vi du xu ly su kien Java AWT");
add(button);
add(textField);
setSize(400, 300);
setLayout(null);
setVisible(true);
}
public static void main(String args[]) {
new AWTEventHandling3();
}
}Kết quả:
Như vậy, thông qua bài học này, mình đã giới thiệu đến các bạn các phương thức xử lý sự kiện trong Javá AWT. Cảm ơn các bạn đã đọc. Sang bài tiếp theo, chúng ta sẽ cùng tìm hiểu một thư viện hỗ trợ xây dựng giao diện khác cải tiến hơn so với Java AWT, đó là Java Swing.