Nội dung
1. Tổng quan về ActionBar, App Bar trong Android
ActionBar giờ được hiểu là App Bar theo thiết kế Meterial Design, nó chứa các thành phần với mục đích điều hướng ứng dụng như:
- Icon ứng dụng
- Nút mũi tên để quay lại cửa sổ cha
- Tiêu đề
- Những nút bấm chính cho Activity
- Các thành phần điều hướng (ví dụ Navigation drawer).

2. Cơ bản sử dụng về ActionBar
Mọi ứng dụng, nếu không có thiết lập gì đặc biệt (Bằng theme) thì sẽ xuất hiện một ActionBar như hình:

2.1 Ẩn ActionBar
Để ẩn actionBar thì ta dùng cú pháp như sau.
ActionBar actionBar = getSupportActionBar();

actionBar.hide();
2.2 Đổi tiêu đề ActionBar
Tiêu đề của ActionBar hiện thị trên đỉnh màn hình được điều khiển bởi file AndroidManifest.xml, trong nút Activity gán tiêu đề vào thuộc tính android:label
<?xml version="1.0" encoding="utf-8"?>
<manifest xmlns:android="http://schemas.android.com/apk/res/android"
    package="com.vncoder.databinding">

    <application
        android:allowBackup="true"
        android:icon="@mipmap/ic_launcher"
        android:label="ActionBar"
        android:roundIcon="@mipmap/ic_launcher_round"
        android:supportsRtl="true"
        android:theme="@style/AppTheme">
        <activity android:name=".MainActivity">
            <intent-filter>
                <action android:name="android.intent.action.MAIN" />

                <category android:name="android.intent.category.LAUNCHER" />
            </intent-filter>
        </activity>
    </application>

</manifest>
Trong đoạn mã trên, Activity có tên MainActivity được thiết lập tiêu đề bằng chuỗi “@string/myactivityname”
2.3 Thay đổi tiêu đề bằng mã khi chạy
Bạn có thể thay đổi tiêu đề, icon của ActionBar bất kỳ lúc nào muốn bằng viết mã Java, trong Activity gọi getSupportActionBar() để lấy đối tượng ActionBar sau đó bạn truy cập các thuộc tính, thiết lập các thuộc tính để thay đổi.
Tham khảo đoạn mã sau:
ActionBar actionBar = getSupportActionBar();
actionBar.setTitle("TIÊU ĐỀ ACTIVITY"); //Thiết lập tiêu đề nếu muốn
String title = actionBar.getTitle().toString(); //Lấy tiêu đề nếu muốn
actionBar.hide(); //Ẩn ActionBar nếu muốn
2.4 Thiết lập hiện thị ICON trên ActionBar Android
Tham khảo đoạn mã sau:
ActionBar actionBar = getSupportActionBar();

actionBar.setDisplayShowHomeEnabled(true);
actionBar.setLogo(R.mipmap.ic_launcher);    //Icon muốn hiện thị
actionBar.setDisplayUseLogoEnabled(true);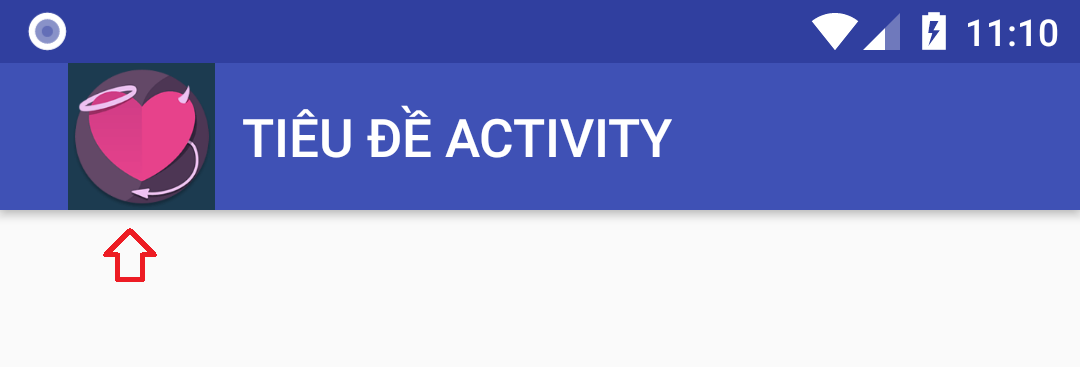
Nhiều trường hợp muốn co kéo icon vừa với ActionBar, có thể tham khỏa mã sau
//Lấy chiều cao của ActionBar
TypedArray styledAttributes =
    getTheme().obtainStyledAttributes(new int[] { android.R.attr.actionBarSize });
int actionBarSize = (int) styledAttributes.getDimension(0, 0);
styledAttributes.recycle();

//Tạo Drawable mới bằng cách thu/phóng
Drawable drawable= getResources().getDrawable(R.drawable.iconsample);
Bitmap bitmap = ((BitmapDrawable) drawable).getBitmap();
Drawable newdrawable = new BitmapDrawable(getResources(),
        Bitmap.createScaledBitmap(bitmap, actionBarSize,  actionBarSize, true));

getSupportActionBar().setDisplayShowHomeEnabled(true);
getSupportActionBar().setLogo(newdrawable);
getSupportActionBar().setDisplayUseLogoEnabled(true);
3. Thêm các Action vào ActionBar
3.1 Tùy biến hiện thị biểu tượng bấm quay trở lại
Mặc định nếu bạn muốn hiện thị biểu tượng có hình mũi tên như là nút bấm quay trở lại cửa sổ trước, hãy dùng đoạn code sau:
getSupportActionBar().setDisplayHomeAsUpEnabled(true);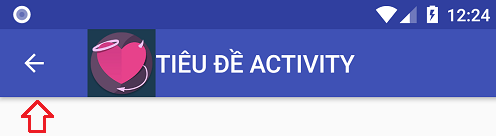
Bạn cũng có thể thay đổi hình mũi tên thành biểu tượng khác
Drawable drawable= getResources().getDrawable(R.drawable.myicon);
//...
getSupportActionBar().setDisplayHomeAsUpEnabled(true);
getSupportActionBar().setHomeAsUpIndicator(newdrawable);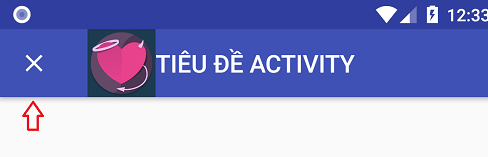
Bắt sự kiện khi bấm vào nút mũi tên quay lại
Các nút bấm Action và kể các nút mũi tên trên ActionBar khi bấm vào sẽ gọi phương thức onOptionsItemSelected(MenuItem item) của Activity, nên muốn bắt các sự kiện khi bấm vào các loại nút bấm này bạn cần quá tải (overrided) phương thức trên, trong đó item chính là đối tượng biểu diễn nút bẩm, thông qua việc xác định ID của item sẽ biết nút nào được bấm.
Lưu ý riêng nút mũi tên bấm quay trở lại ở trên, có ID cố định là: android.R.id.home
Xem đoạn mã sau, khi bấm vào nút quay lại, sẽ tương ứng bấm vào nút back cứng của điện thoại
@Override
public boolean onOptionsItemSelected(MenuItem item) {
    switch (item.getItemId())
    {
        case android.R.id.home:
            onBackPressed();
            return true;

        default:break;
    }

    return super.onOptionsItemSelected(item);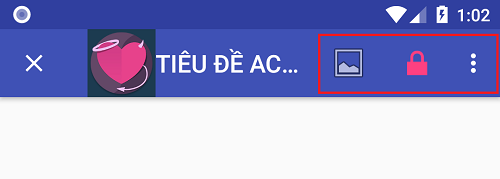
}Để nạp một menu vào ActionBar của Activity, bạn chỉ việc quá tải phương thức onCreateOptionsMenu, ví dụ nạp menu định nghĩa trong XML: R.menu.mymenu
@Override
public boolean onCreateOptionsMenu(Menu menu) {
    getMenuInflater().inflate(R.menu.mymenu, menu);
    return true;
}
Và nội dung \res\menu\mymenu.xml có dạng:
<?xml version="1.0" encoding="utf-8"?>
<menu xmlns:app="http://schemas.android.com/apk/res-auto"
    xmlns:android="http://schemas.android.com/apk/res/android">
    <item
        android:id="@+id/menu1"
        android:icon="@android:drawable/ic_menu_gallery"
        android:title="Menu 1"
        app:showAsAction="ifRoom" />
    <item
        android:id="@+id/menu2"
        android:icon="@android:drawable/ic_lock_lock"
        android:title="Menu 2"
        app:showAsAction="always" />
    <item
        android:id="@+id/menu3"
        android:checkable="false"
        android:icon="@android:drawable/ic_lock_silent_mode"
        android:title="Menu3"
        app:showAsAction="collapseActionView" />
</menu>
Tương tự như trên, để bắt sự kiện khi bấm vào các menu này bạn chỉ việc chỉnh lại onOptionsItemSelected thêm các kiểm tra cho menu có id là menu1, menu2 …
@Override
public boolean onOptionsItemSelected(MenuItem item) {
    switch (item.getItemId())
    {
        case android.R.id.home:
            onBackPressed();
            return true;
        case R.id.menu1:
            //code xử lý khi bấm menu1
            break;
        case R.id.menu2:
            //code xử lý khi bấm menu2
            break;
        case R.id.menu3:
            //code xử lý khi bấm menu3
            break;
        default:break;
    }

    return super.onOptionsItemSelected(item);
}
4. Toolbar trong Android
Toolbar được giới thiểu từ API 21, nó như là mở rộng của ActionBar, giúp cho việc tùy biến dễ dàng hơn ActionBar. Trong thư viện AppCompat, Toolbar được triển khai ở lớp android.support.v7.widget.Toolbar
Khác biệt giữa Toolbar và ActionBar đó là với Toolbar nó là một View (ViewGroup), nên nó có thể khai báo trong Layout, nó có thể chứa các View khác để bạn thoải mái tùy biến, nó có thể nằm ở vị trí tùy biến khác nhau trong Layout, có thể thực hiện các Animate dễ dàng, có thể chèn nhiều Toolbar trong một Active
4.1 Sử dụng Toolbar như ActionBar
Đầu tiên bạn cần đảm bảo tích hợp thư viện AppCompat-v7 vào build.gradle
dependencies {
    ....
    implementation 'com.android.support:appcompat-v7:26.1.0'
}
Tiếp theo cần hủy ActionBar bằng cách thay đổi thông số Theme có:
<item name="windowActionBar">false</item>Ví dụ sử dụng trực tiếp Theme có tên Theme.AppCompat.Light.NoActionBar để xây dựng AppTheme đã hủy ActionBar
<resources>

    <!-- Base application theme. -->
    <style name="AppTheme" parent="Theme.AppCompat.Light.NoActionBar">
        <!-- Customize your theme here. -->
    </style>

</resources>
Từ lúc này trong Layout của Activity bạn có thể thêm Toolbar, ví dụ:
<?xml version="1.0" encoding="utf-8"?>
<android.support.constraint.ConstraintLayout
    xmlns:android="http://schemas.android.com/apk/res/android"
    xmlns:app="http://schemas.android.com/apk/res-auto"
    xmlns:tools="http://schemas.android.com/tools"
    android:layout_width="match_parent"
    android:layout_height="match_parent"
    android:fitsSystemWindows="true"
    tools:context="net.xuanthulab.toolbar.MainActivity">

    <android.support.v7.widget.Toolbar
        android:id="@+id/toolbar"
        android:minHeight="?attr/actionBarSize"
        android:layout_width="match_parent"
        android:layout_height="wrap_content"
        app:titleTextColor="@android:color/white"
        android:background="?attr/colorPrimary">
    </android.support.v7.widget.Toolbar>
</android.support.constraint.ConstraintLayout>
Trong đoạn mã trên bạn cũng lưu ý android:fitsSystemWindows=”true” để layout tính toán chính xác chiều cao khi đã hủy ActionBar.
Giờ thì Toolbar đã chạy với vai trò như là một View, để Toolbar này có chức năng như ActionBar thì bạn thể thêm đoạn mã như sau:
public class MainActivity extends AppCompatActivity {

    @Override
    protected void onCreate(Bundle savedInstanceState) {
        super.onCreate(savedInstanceState);
        setContentView(R.layout.activity_main);

        Toolbar toolbar = (Toolbar) findViewById(R.id.toolbar);
        setSupportActionBar(toolbar);


        ActionBar actionBar = getSupportActionBar();
        //Toobar đã như ActionBar

    }
    @Override
    public boolean onCreateOptionsMenu(Menu menu) {
        getMenuInflater().inflate(R.menu.mymenu, menu);
        return true;
    }


    @Override
    public boolean onOptionsItemSelected(MenuItem item) {
        //..
        return super.onOptionsItemSelected(item);
    }
}
Kết quả Toolbar đã giống với ActionBar
4.2 Tùy biến Style của Toolbar
Style của Toolbar có thể chỉ định và tùy biến với các thuộc tính android:theme, app:titleTextAppearance, app:popupTheme,
<android.support.v7.widget.Toolbar
    android:id="@+id/toolbar"
    android:layout_width="match_parent"
    android:layout_height="wrap_content"
    android:minHeight="?attr/actionBarSize"
    android:background="?attr/colorPrimary"
    android:theme="@style/ToolbarTheme"
    app:titleTextAppearance="@style/Toolbar.TitleText"
    app:popupTheme="@style/ThemeOverlay.AppCompat.Light"
/>
ToolbarTheme, Toolbar.TitleText soạn thảo trong res/values/styles.xml, ví dụ:
<resources>

    <!-- Base application theme. -->
    <style name="AppTheme" parent="Theme.AppCompat.Light.NoActionBar">
        <!-- Customize your theme here. -->
        <item name="colorPrimary">@color/colorPrimary</item>
        <item name="colorPrimaryDark">@color/colorPrimaryDark</item>
        <item name="colorAccent">@color/colorAccent</item>
    </style>

    <style name="ToolbarTheme" parent="@style/ThemeOverlay.AppCompat.Dark.ActionBar">
        <!-- android:textColorPrimary: Màu chữ Tiêu đề  -->
        <item name="android:textColorPrimary">@android:color/holo_blue_light</item>
        <!-- actionMenuTextColor: Màu chữ Menu  -->
        <item name="actionMenuTextColor">@android:color/holo_green_light</item>
        <!-- Tints -->
        <item name="colorAccent">#a13636</item>
        <!-- Màu áp dụng cho các View ở trạng thái bình thường -->
        <item name="colorControlNormal">#d9cfcf</item>
        <!-- Màu View đang hoạt động -->
        <item name="colorControlActivated">#934848</item>
        <!-- Highlight (i.e ripples or list selectors) -->
        <item name="colorControlHighlight">#111</item>
    </style>

    <style name="Toolbar.TitleText"
            parent="TextAppearance.Widget.AppCompat.Toolbar.Title">
        <item name="android:textSize">21sp</item>
        <item name="android:textStyle">italic</item>
        <item name="android:textColor">@android:color/holo_orange_light</item>
    </style>


</resources>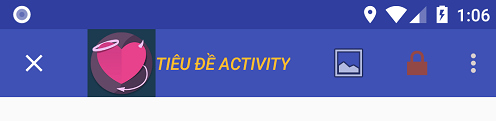
4.3 Thiết lập hiện thị Icon ứng dụng
Làm tương tự như ActionBar thông thường, ngoài ra có thêm thiết lập vị trí hiện thị Icon ứng dụng
<android.support.v7.widget.Toolbar
      android:id="@+id/toolbar"
      app:contentInsetLeft="0dp"
      app:contentInsetStart="0dp"
      ...
      >
</android.support.v7.widget.Toolbar>
4.4 Tùy biến tiêu đề bằng chèn View
Ví dụ dùng TextView để thể hiện Title của Toolbar
<pre class="prettyprint"><android.support.v7.widget.Toolbar
android:id="@+id/toolbar"
android:minHeight="?attr/actionBarSize"
android:layout_width="match_parent"
android:layout_height="wrap_content"
app:titleTextColor="@android:color/white"
android:background="?attr/colorPrimary">
<TextView
android:id="@+id/toolbar_title"
android:layout_width="wrap_content"
android:layout_height="wrap_content"
android:text="Toolbar Title"
android:textColor="@android:color/white"
style="@style/TextAppearance.AppCompat.Widget.ActionBar.Title"
android:layout_gravity="center"
/>
</android.support.v7.widget.Toolbar> </pre>Trong code Java thực hiện
/* Trong Activity - OnCreate */
Toolbar toolbar = (Toolbar) findViewById(R.id.toolbar);
setSupportActionBar(toolbar);
// Loại bỏ tiểu đề mặc định
getSupportActionBar().setDisplayShowTitleEnabled(false);
// Lấy đối tượng tiêu đề tùy biến
TextView mTitle = (TextView) toolbar.findViewById(R.id.toolbar_title);
5. Tổng Kết :
Chúng ta vừa xem qua các kiến thức liên quan đến việc xây dựng một ActionBar. Có lẽ bạn đã hiểu được tính tiện dụng của ActionBar khi cung cấp các tùy chọn đến các chức năng khác của ứng dụng, mà không làm ứng dụng của chúng ta trở nên rối hơn, hi vọng bài viết giúp ích được nhiều cho các bạn trong quá trình làm việc.